Create Static Website on AWS with CDK

Here’s the basic senario, you need to create a static website and get it deployed but don’t know what resources you need, don’t want to deal with servers or a large hosting provider. You want to have control of your assets, be able to add services as needed all with the ability to deploy your site with some level of change managment.
Simple!
Use Amazon Cloud Development Kit!
The AWS CDK allows for Infrastructure as Code for your applications or systems. Simply put it allows you to define your resources the application or in this case website, is going to need so everything is deployed and managed as one cohesive unit. If you need to add a database you define the database resources, security and connections. Need an ec2 server that’s fine too, define the size, type, availability and VPC and you’re off to the races. The same goes for almost any Amazon service, DynamoDB, Lex, S3, EKS, etc… I think you get the point. Everything is defined in code so the same development tools used for management and version control apply here, including CI/CD pipelines.
- CDK Basics and Installation
- Defining your project
- Creating Resources
- Creating your static site
CDK Basics and Installation
I would alway recommend checking out the docs and information, Amazon does a great job of documenting their services which can be found here –> AWS CDK. I use multiple operating systems so I’ve installed it via the installer (Windows), npm (Linux) and brew (Mac) with some mix depending on issues or requirements. The default language for CDK is TypeScript so if you have Node installed it’s the most forward way to get everything working. Node is used on the backend of CDK so it’s a requirement and can be found here Node Download.
Here’s the currently supported languages from the AWS documentation. I’ll be using TypeScript and Linux in this tutorial.
| Language |
|---|
| TypeScript |
| JavaScript |
| Python |
| Java |
| C# |
| Go |
Now that you have Node and the CDK installed you need to configure the environment the easiest way is with the cli by executing the configure command.
aws configure
CDK leverages AWS CloudFormation and S3 to deploy and manage the enviroment for those to be created and configured execure the bootstrap command.
cdk bootstrap aws://<ACCOUNT-NUMBER>/<DESIRED-REGION>
This will create a bucket similar to this: 
And a CloudFormation template like this: 
We are now ready to create our project!!!
Creating our Project
Lets create or working directory and initialize our project
mkdir ~/static-website
cd ~/static-website
cdk init app --language typescript
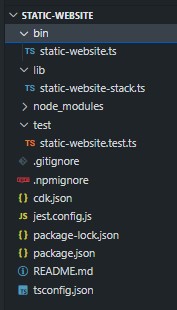
This will create the project and initialize a git repository for you so all changes from here will be tracked. The directory stucture in your project should look like this:
Now that your project is created we need to define some environment variables AWS and deployment. Open the file ./bin/static-website.ts and uncomment and update the line
env: { account: '123456789012', region: 'us-east-1' },
so that it matches your AWS account and region you want to deploy to.
The file will look like this:
#!/usr/bin/env node
import 'source-map-support/register';
import * as cdk from 'aws-cdk-lib';
import { StaticWebsiteStack } from '../lib/static-website-stack';

const app = new cdk.App();
new StaticWebsiteStack(app, 'StaticWebsiteStack', {
  /* If you don't specify 'env', this stack will be environment-agnostic.
   * Account/Region-dependent features and context lookups will not work,
   * but a single synthesized template can be deployed anywhere. */

  /* Uncomment the next line to specialize this stack for the AWS Account
   * and Region that are implied by the current CLI configuration. */
  // env: { account: process.env.CDK_DEFAULT_ACCOUNT, region: process.env.CDK_DEFAULT_REGION },

  /* Uncomment the next line if you know exactly what Account and Region you
   * want to deploy the stack to. */
 env: { account: '123456789012', region: 'us-east-1' }, //  <------------Change this line

  /* For more information, see https://docs.aws.amazon.com/cdk/latest/guide/environments.html */
});
Now we get to add the resources you will need to deploy your site.
You need to have a few things we are going to configure. All resource configuration happens in the ./lib/static-website-stack.ts file.
- DNS Domain hosted in S3
- S3 Bucket to host your content
- Content to host
First let’s create the directory for your web content - depending on what you’re deploying this will be the content we are putting in S3.
mkdir ./web-content
Since we need to have those resources we need to import the associated libraries for them. Add these lines to the top of the file under the Construct:
You can comment out or delete the aws-sqs line since we aren’t using that service.
import * as s3 from 'aws-cdk-lib/aws-s3';
import * as s3Deployment from 'aws-cdk-lib/aws-s3-deployment'
import * as route53 from 'aws-cdk-lib/aws-route53'
This imports the constructs, methods and other various parts we need to for these services.
- We need s3 because it’s going to be hosting our content
- s3Deployment gives us the ability to populate or S3 Bucket from local disk or other buckets
- route53 is AWS’ DNS service and we will need to create and update the records there
Let’s first define the subdomain ‘www’, domain and web asset directory:
export class StaticWebsiteStack extends cdk.Stack {
  constructor(scope: Construct, id: string, props?: cdk.StackProps) {
    super(scope, id, props);

    const recordName = 'www';
    const siteDomainName = 'mydomain.com';
    const webAssetDirectory = 'web-content';
We are going to use those variables later and it’s a good practice to not include static definitions in your code, if possible.
Define our s3 bucket properties:
      const webBucket = new s3.Bucket(this, 'webbucket', {
        bucketName: [recordName, siteDomainName].join('.'),     // Bucket name needs to match the website DNS
        publicReadAccess: true,                                 // Enables public access for a website
        removalPolicy: cdk.RemovalPolicy.DESTROY,               // When we update it's actually a delete and replace
        autoDeleteObjects: true,                                // Don't ask us for permission just do it
        websiteIndexDocument: 'index.html'                      // Entry file for the site
      });
Copy our data from the ./web-content directory to S3
      // Copy the web assets to the S3 bucket
      new s3Deployment.BucketDeployment(this, "deployStaticWebsite", {
        sources: [s3Deployment.Source.asset(webAssetDirectory)],
        destinationBucket: webBucket,
      });
Now we have our bucket created at www.mydomain.com and we have assets from the ./web-content directory placed in the bucket. Now we need to redirect traffic from the bucket of mydomain.com so everyone ends up in the same place.
      // redirect the root domain bucket to the www bucket
      const redirectBucket = new s3.Bucket(this, "redirectBucket", {
        bucketName: siteDomainName,                                             // defines the name of the bucket
        websiteRedirect: { hostName: [recordName, siteDomainName].join('.') }   // Redirects 'mydomain.com'
      });
Update the DNS records as needed
    // Get the DNS base zone to update the record in the next step
    const zone = route53.HostedZone.fromLookup(this, 'baseZone', {
      domainName: siteDomainName
    });

    new route53.ARecord(this, 'AliasRecord', {
      zone,                             // mydomain.com
      recordName,                       // www
      // creates the target record with the bucket information
      target: route53.RecordTarget.fromAlias(new cdk.aws_route53_targets.BucketWebsiteTarget(webBucket)),
    });
Our CDK configuration is complete!
Head back to the command line and execute cdk synth if everything is configured correctly you should get a CloudFormation template with all the changes it will deploy to your environment.
Now we create the web content - to keep it simple we are going to create a simple Hello World page and you can go wild from there!
cd ./web-content
touch index.html
Open the file index.html in your favorite editor and add the following content.
<!DOCTYPE HTML>
<html>
    <head>
        <title>Hello World!</title>
    </head>
    <body>
        <h1>Hello World!</h1>
    </body>
</html>
Back at the command line execute cdk deploy in the root directory of your project. It’s going to take a minute to deploy the resources and will ask for any changes to permissions. Once complete browse to your address at http://www.mydomain.com and you should get your new static Hello World page!
Cheers!