Pihole with Windows DNS

I’ve had an idea for a bit and wanted to try it out. There’s no reason why it wouldn’t work but I can certainly think of a few reasons why would woudn’t want to do this.
- Bad Reasons
- Active Directory Replication - Depending on your convergence time, number of domain controllers and DNS zones. This might be a bad idea! I’m doing this in my home lab with two domain controllers so I expect it’s not going to be a big deal
- You can turn Pihole off if it’s not working properly. This would require you to delete the zone from DNS and allow it to replicate - See first reason! Additionally you would need to stop the scheduled process if you have it automatically updating on a schedule.
- It’s exceptionally easy to have Pihole running in a docker container and forward your DNS to the container then to the internet.
- Maybe Reasons
- Malware domain lists - It’s all about tradeoffs so it may be worth saving a bit of a potential headache especally if you have click happy users.
First we need to setup our lab which is simply going to consist of two AD/DNS servers. DNS will be replicated as AD integrated zones and forwarding to local DNS.
| DC Name | IP Address | Primary DNS |
|---|---|---|
| DC01 | 10.10.10.10 | 10.10.10.20 |
| DC02 | 10.10.10.20 | 10.10.10.10 |
- Install ActiveDirectory Domain Services on both systems
Install-WindowsFeature -name AD-Domain-Services -IncludeManagementTools - This is a new forest and domain so let’s get it all going. Starting on DC01:
Install-ADDSForest -DomainName lab.local -DomainMode Win2012 -ForestMode Win2012 -InstallDNS:$true- It will prompt you for a SafeMode Password so enter your super secret password.
- Confirm reboot - I hit ‘A’ for Yes to All
- Installation starts and wait for it to complete and reboot. On the second system (DC02) we need to wait for the first to finish then we can add the system to the domain.
Install-ADDSDomainController -DomainName lab.local -Credential (Get-Credential lab\Administrator) -InstallDNS:$true - I always use the
Get-Credentialwhen possible. The scripts and command-line are horrible places for passwords.
Everything is complete so let’s check to make sure DNS is installed and running:
-
Simple check of DNS to make sure everything is good and we notice we don’t have any reverse lookup zone for our network
10.10.10.0/24so let’s create it real quick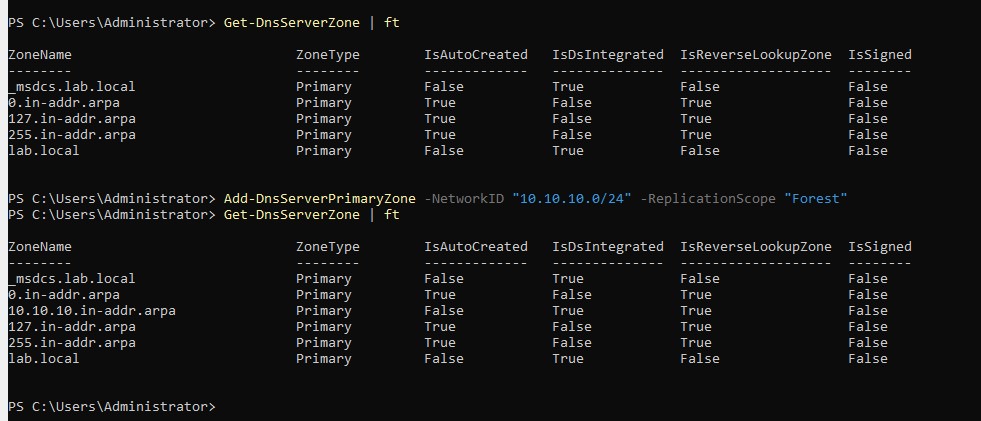
-
Check and make sure it’s replicated to the second DC
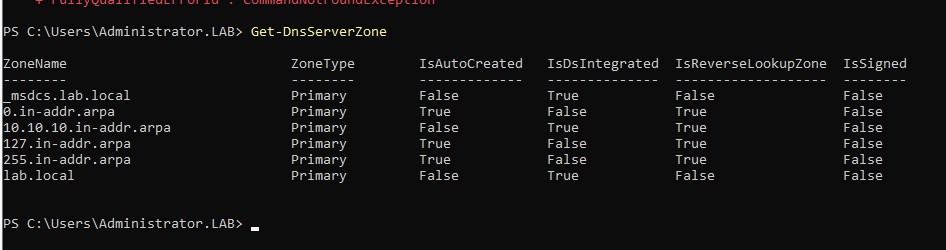
OK! We have our domain setup and configured without any major issues so let’s get our DNS data and see what we can do.
Going for the simple list we are going to be using Stephen Black’s block list. Stephen has an awesome setup that let’s you update the /etc/hosts file on your system to block ads, malware, etc. We are just extending this to AD DNS. His host files are formatted as 0.0.0.0 <domain.name> so the query fails. It’s very effective and I use it on my personal laptop for when I’m not behind my home filters.
We are going to pull the domain names from the second column and use that to create a zone. Within that zone we will have a record doing the exact same as Stephen and point to 0.0.0.0.
- First let’s create some sample data - I’ll just copy the first few lines out of his files on (GitHub)[https://github.com]{:”target”=”_blank”}
May do this again with BIND just because…